On the Wet Coast an outdoor kitchen only earns its space if you can use it in the rain. Here is how we plan the cover, the heat, the weatherproof cabinetry, and the rough-in that has to happen before the slab pours.
Every spring a client shows me a photo of an outdoor kitchen and asks for one just like it. The photo is always taken in July, in the sun, open to the sky, and it looks perfect. Then I ask the question that changes the whole plan: are you going to use this in November?
On the Wet Coast, an outdoor kitchen that is open to the weather gets used for a few weeks of good summer and sits wet and unused for the rest of the year. The stainless rusts, the cabinet doors swell and stop closing, and the barbecue gets a cover thrown over it in September and stays covered until June. I have been called in to rescue more than one of these. The fix is always the same, and it is the thing that should have been designed in from the start: a cover, heat, weatherproof materials, and a rough-in that was done before the concrete poured.
So here is how we design an outdoor kitchen in BC that earns its space all year, not just in the summer photos.
Cover it, or do not bother
This is the decision that makes or breaks an outdoor kitchen in our climate, so we settle it first. Metro Vancouver is a high-rainfall coastal climate; the rain is heavy enough that the building code makes us wrap every new home in a drained rainscreen. If the rain changes how we build the walls, it changes whether an open outdoor kitchen is worth building at all.
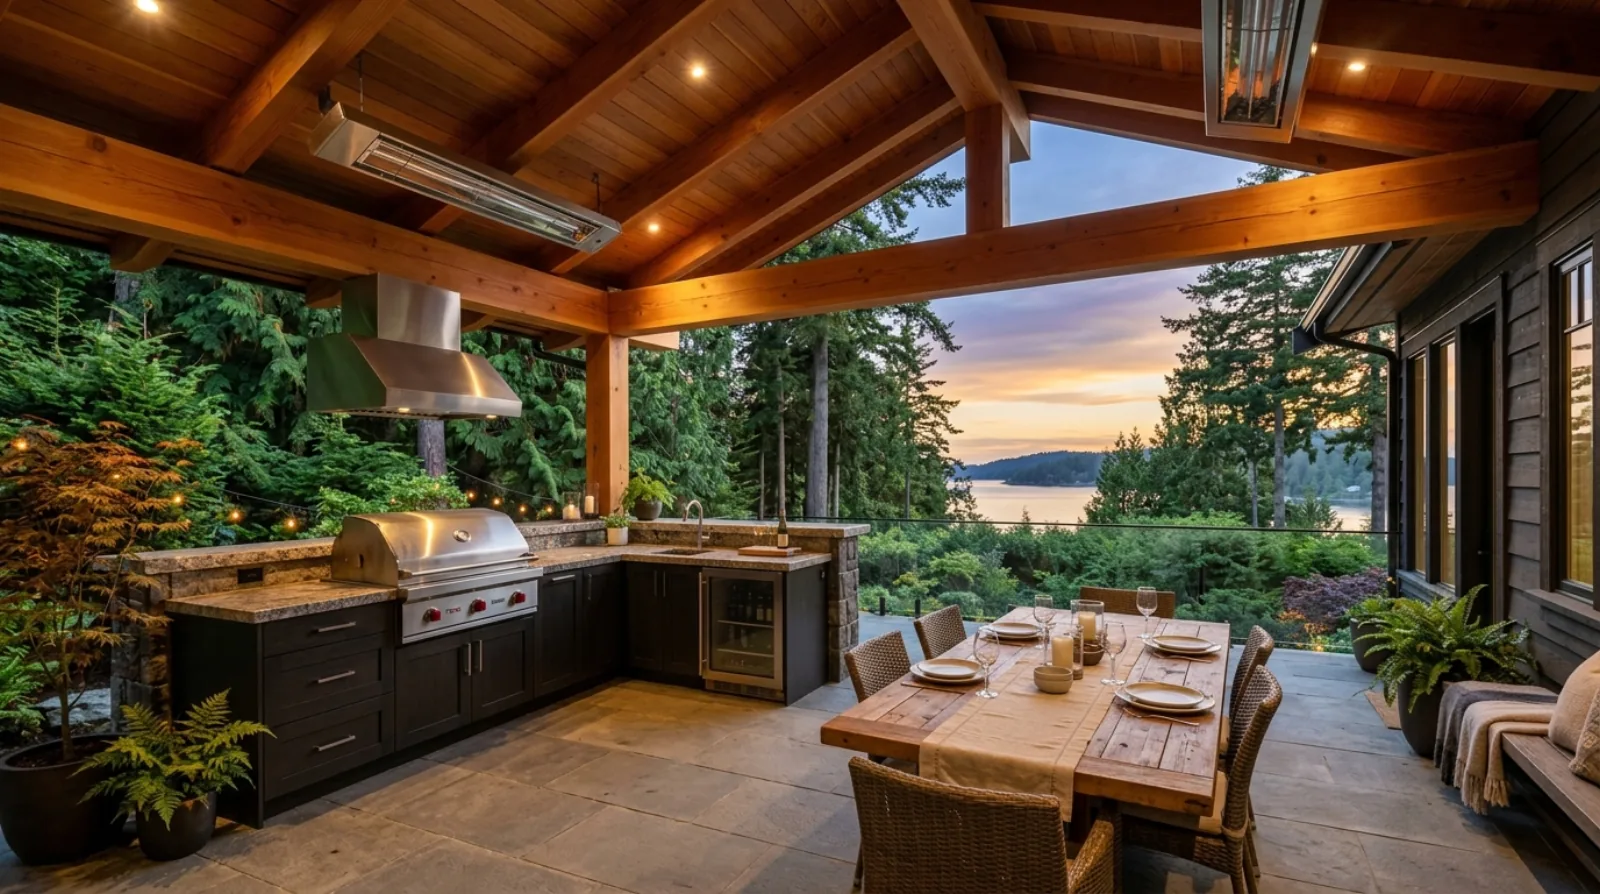
A real roof over the cooking and prep zone is what turns a summer-only patio into a room you use most of the year. Covered, you can grill in a light rain, the appliances stay dry, and the space stays clean. The cover can be an extension of the main roof, a solid patio roof on its own posts, or a well-built structure over the cooking core with the dining area more open. What matters is that the working part, the grill, the counter, the storage, the sink, stays dry.
We usually design the cover so the cooking zone is fully protected and the seating can spill out from under it toward the yard, so you get the sheltered core and the open feeling both. The grill needs proper clearance and venting under any cover, because a barbecue throws heat and smoke and cannot sit tight against a low ceiling. That clearance is part of the design, not an afterthought.
Heat: what makes the shoulder seasons usable
A cover keeps the rain off. Heat is what lets you actually sit out there in spring and fall, when the Lower Mainland is dry some evenings but cool.
Overhead radiant heaters are the workhorse. Mounted into the covered ceiling, they warm the people and surfaces below directly, which works far better outdoors than trying to heat the air, since the air just drifts away. Electric radiant heaters are clean and simple and run off circuits we plan into the electrical layout. Gas radiant heaters put out more heat for a large covered area but need a gas line and proper clearance. Either way, the heaters get located and roughed in during design, because they hang from the structure and wire back into the panel, and both of those are framing-and-rough-in decisions.
An outdoor fireplace or a fire feature adds warmth and a focal point, and on a covered patio it needs the same careful venting and clearance as any fireplace. We treat it with the same care we bring to an indoor fireplace: the flue, the clearances, and the surrounds all have to be right, outdoors even more so because weather is working on it too.
The rough-in that has to happen before the slab pours
This is the part people forget, and it is the part you cannot fix later without breaking concrete. An outdoor kitchen needs gas, water, drainage, and power, and all of it has to be located before the slab goes down.
Gas. The grill and any side burners want a gas supply run out to the cooking core so you are not swapping propane tanks forever. That line is planned and roughed in during design and connected by a licensed gas fitter.
Water and drainage. An outdoor sink needs a supply line and a drain. In our climate the supply lines that run outdoors have to be protected against freezing, which usually means they can be drained down or are routed to stay warm, so a cold snap does not split a pipe. The drain has to tie into the home's drainage plan. This is the same discipline we apply to the indoor plumbing rough-in: the sink and drain positions get locked before anything closes up.
Power. A fridge, lighting, the heaters, and outlets for small appliances all need weatherproof, outdoor-rated circuits and receptacles. Outdoor circuits have their own protection requirements, and they get planned into the home's electrical layout up front. Adding an outlet to a finished patio means breaking the slab and pulling wire the hard way.
An outdoor kitchen is decided under the slab. The gas, the water, the drain, and the power all go in before the concrete, because once it cures, every one of them is a jackhammer away.
Icon Projects Team
Drainage: the detail that protects the whole thing
Water management is where an outdoor kitchen either lasts or slowly destroys itself, and it is invisible in the finished photos.
The floor of the outdoor kitchen has to shed water. We slope the slab away from the house and toward drains so rain and washdown water leave fast instead of pooling against the foundation or under the cabinets. Standing water at the base of an outdoor cabinet run is what rots and corrodes it from the bottom. On a covered patio, the roof also has to carry its rain somewhere controlled, into gutters and downspouts that tie into the site's drainage, not just dumping at the edge of the slab where it undermines the patio over time.
This ties directly into how the whole site handles water. An outdoor kitchen is one more surface shedding rain, and it has to fit the lot's overall landscaping and site drainage plan, so the water it sheds is carried away from the house and the neighbours rather than pooling somewhere it causes damage. We plan the two together.
Weatherproof cabinetry and materials
Everything in an outdoor kitchen lives in the weather, so everything gets chosen for survival, not just looks. Indoor kitchen cabinets belong indoors; put them outside and they swell, warp, and fail within a couple of seasons.
For the cabinets we use marine-grade or powder-coated metal, or a dedicated outdoor-rated cabinet system built to take damp and temperature swings. Countertops are stone or another outdoor-rated surface that handles freeze, sun, and rain without staining or cracking. Appliances should be an outdoor-rated grade of stainless, not the indoor version, because the indoor grade streaks and corrodes outside. Every fastener, hinge, and pull has to resist corrosion, or the hardware fails first while the boxes are still fine.
This is the same durability-first thinking we bring to the indoor kitchen, turned up a notch, because the Wet Coast is harder on materials than any indoor room. The bargain outdoor cabinet looks the same as the good one on day one and visibly worse by the second winter.
Where it connects to the house and the yard
An outdoor kitchen works best when it flows from the house and out into the yard, not stranded on its own. The strongest layouts put it a step from the indoor kitchen or the main living space, so carrying food and dishes in and out is easy and the two spaces feel like one when the doors are open.
It also has to sit inside the larger outdoor living and landscape design plan. The covered kitchen, the dining area, the seating, and the connection to the yard all get designed together, the way we lay out any outdoor living and deck space, so the kitchen is part of a room you live in rather than an appliance parked on a patio. Get the flow right and the outdoor kitchen becomes the place the household actually gathers from spring through fall, and on a dry winter evening too.
Covered, heated, weatherproofed, and roughed in properly, an outdoor kitchen is one of the most-used spaces we build on a BC lot. Open to the sky with the utilities added as an afterthought, it is a summer photo that spends most of the year wet. The difference is all decided before the slab pours.
Frequently asked questions
- Is an outdoor kitchen worth it in BC's rainy climate?
- Only if it is covered. An open outdoor kitchen gets used for a few weeks of good weather and sits wet and unused for the rest of the year, while the appliances and cabinets weather. Icon Projects builds outdoor kitchens as covered, weatherproof rooms with a real roof over the cooking zone and radiant heat for the shoulder seasons, so the space works from spring through fall and even on a dry winter day. Covered, it earns its space. Open to the sky on the Wet Coast, it usually does not.
- What rough-in does an outdoor kitchen need before the slab pours?
- Gas, water, drainage, and power all have to be located before the concrete goes down. Icon Projects roughs in the gas line for the grill and any burners, a water supply and drain for an outdoor sink, weatherproof electrical circuits and outlets for the fridge and lighting, and the slope and drains that carry rain and washdown water away. Adding any of these to a finished patio means breaking the slab, so the full rough-in gets planned with the outdoor kitchen layout before anything pours.
- What cabinetry and materials hold up in an outdoor kitchen?
- Materials rated for the outdoors and constant damp. Icon Projects uses marine-grade or powder-coated metal or dedicated outdoor-rated cabinet systems rather than indoor kitchen cabinets, which swell and fail outside. Countertops are stone or another surface that takes freeze, sun, and rain without staining or cracking. Stainless appliances should be an outdoor-rated grade, and all hardware and fasteners have to resist corrosion. The Wet Coast is hard on materials, so everything gets chosen for survival, not just looks.
- Does an outdoor kitchen need heat to be usable in BC?
- Yes, if you want it usable outside of summer. A cover keeps the rain off, but overhead radiant heat is what lets people sit out there in spring and fall when the Lower Mainland is dry but cool in the evening. Icon Projects mounts electric or gas radiant heaters into the covered ceiling so they warm people and surfaces directly, which works far better outdoors than trying to heat the surrounding air.
- Can an outdoor fireplace be added to a covered outdoor kitchen?
- Yes, an outdoor fireplace or fire feature adds warmth and becomes a focal point on a covered patio. It needs the same careful venting and clearance planning as any fireplace, and outdoors that attention matters even more because weather is working against the flue and surrounds constantly. Icon Projects treats an outdoor fireplace with the same care given to an indoor fireplace, sizing the flue and clearances correctly at the design stage.
- Why does an outdoor kitchen slab need to be sloped?
- So rain and washdown water leave the space instead of pooling against the foundation or under the cabinets. Icon Projects slopes the outdoor kitchen slab away from the house and toward drains, because standing water at the base of an outdoor cabinet run is what rots and corrodes it from the bottom. The roof over a covered kitchen also needs gutters and downspouts that tie into the site's drainage plan rather than dumping water at the slab edge.
- Should an outdoor kitchen connect directly to the indoor kitchen?
- It works best when it does. Icon Projects places the strongest outdoor kitchen layouts a step from the indoor kitchen or main living space, so carrying food and dishes in and out is easy and the two spaces feel like one when the doors are open. The covered kitchen, dining area, and seating are designed together with the yard connection in mind, rather than stranding the outdoor kitchen as an appliance parked alone on the patio.
- What happens if the gas and electrical rough-in for an outdoor kitchen is skipped?
- Adding gas, water, drainage, or power to a finished outdoor kitchen patio means breaking the concrete slab to reach it. Icon Projects plans the grill's gas line, the sink's water supply and drain, and the weatherproof electrical circuits for the fridge and lighting before the slab pours, because none of these utilities can be added cleanly once the concrete has cured.