Industry & Code
Insulation and Air-Sealing for a Burnaby Custom Home: Meeting Step 3 + EL-4 and Prepping for Step 5
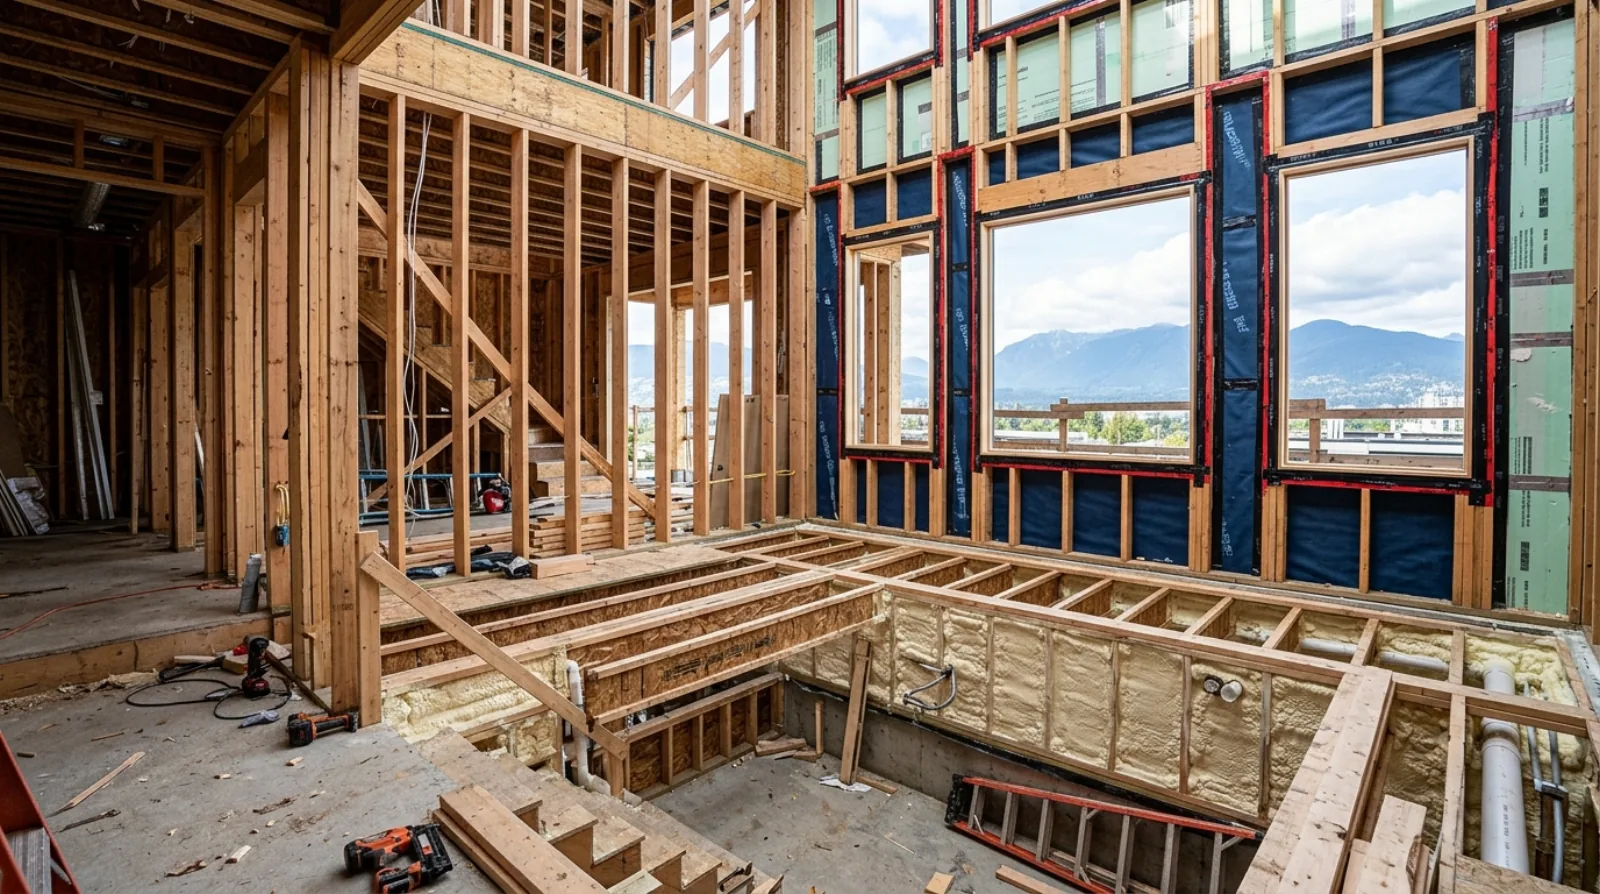
On the BC south coast, the insulation an owner asks about and the air barrier that actually keeps the house warm are two different things. Here's how we build a wall that passes the blower-door test today and won't need tearing apart for Step 5.
What's the difference between insulation and air-sealing in a custom home?
Insulation slows heat from moving through a material, it's the R-value in your walls and attic. Air-sealing stops air from leaking through the gaps between materials, the joints, seams, and penetrations. A Burnaby home needs both, but on the BC south coast the air barrier is what passes or fails the energy code's blower-door test, and it's the part owners almost never ask about.
We're a Burnaby custom home builder working across the Lower Mainland, and this is the conversation we have to slow down for on nearly every project. An owner will spend an hour comparing R-values and then never mention the air barrier, which is the layer that decides whether all that insulation actually does its job. The two work as a pair. Get the air-sealing wrong and the best insulation on the market underperforms. Get it right and a sensible wall outperforms its own R-value.
Burnaby's energy code today, and where it's going
Burnaby's current requirement for new single-family construction is Step 3 of the BC Energy Step Code plus EL-4 of the Zero Carbon Step Code. Step 3 sets how energy-efficient the building has to be; EL-4 is the lowest-emissions tier, which on a custom home usually means no fossil-fuel heating. We've written the homeowner-level explainer of how these two systems stack in BC Energy Step Code explained for homeowners, and it's worth reading first if the step numbers don't mean anything to you yet.
Step 5, the highest performance tier, roughly Passive House territory, is the provincial target for new construction around 2032. Some builders deliver it voluntarily now. The reason we keep one eye on Step 5 while building to Step 3 is simple: the wall, the air barrier, and the testing regime that gets a house to a comfortable Step 3 result are the same details that get it to Step 5. The gap between the two is mostly a matter of how much continuous insulation goes on and how tight the blower-door number has to be, not a different way of building. A house detailed properly now doesn't get torn apart later.
Both steps are verified by a measured air-tightness test. That test is the thing every detail in this post is aiming at.
The blower-door test, and why air-sealing decides it
Near the end of framing and again before drywall, an energy advisor seals a calibrated fan into a doorway and depressurizes the house, pulls the inside air pressure down so outside air rushes in through every gap. The result is reported in air changes per hour at 50 pascals (ACH₅₀): how many times the home's full volume of air leaks out and gets replaced in an hour under that test pressure. Lower is tighter.
Insulation barely moves that number. Air-sealing is almost the entire score. We've watched a house with ordinary batt insulation test tight because the air barrier was continuous, and watched a house packed with premium product test leaky because the seams were open. The fan doesn't care what's in the cavity. It cares whether air can get around it.
There's a second reason the blower-door number matters on the coast, and it's about water, not just heat. Air leaking out of a warm house in January carries moisture with it. When that moist air hits the cold sheathing inside the wall, the water condenses and sits there, the same trapped-water rot pattern we described in our piece on exterior cladding for a Burnaby custom home. A tight air barrier isn't only an energy feature. It's a durability feature.
Insulation is the number owners ask about. The blower-door result is the number that decides whether the house is actually warm. They are not the same conversation, and on the coast the second one matters more.
Icon Projects Team
Where heat and moisture actually leak
Owners picture heat escaping through the broad face of a wall. It mostly doesn't. It escapes through the seams, the predictable handful of places where one material meets another and nobody drew a continuous detail. On a Burnaby build, the repeat offenders are always the same:
- The rim joist (band joist). The band of framing where each floor meets the exterior wall is the single leakiest spot in most houses. It's a maze of intersecting wood, sitting right at the temperature boundary, and it's easy to skip. We air-seal and insulate every rim joist as a deliberate step, not an afterthought.
- The wall-to-ceiling line. Where the top of the wall meets the ceiling plane, the air barrier has to make a continuous turn. Top-plate gaps and poly that stops short here are a classic leak, and the warm air that escapes goes straight into the attic.
- The bottom plate. Where the wall's bottom plate sits on the slab or subfloor, a gasket or sealant bead stops air being drawn in along the floor line. Skip it and you get cold floors no amount of cavity insulation fixes.
- Every window and door rough opening. The gap between the frame and the structural opening has to be air-sealed independently of the cladding outside it. This is where deeper window installs and Burnaby winters intersect, we go into the glazing side of it in windows and glazing for a Burnaby winter.
- Penetrations. Plumbing stacks, electrical and dryer vents, the range hood duct, recessed-light cans, the HRV ports. Every hole punched through the air barrier is a leak until it's sealed and gasketed.
Find these on the drawings and again with a smoke pencil during the blower-door test, and the energy number takes care of itself.
The air barrier as a system, not a product
The mistake we see most often is treating the air barrier as one product, a roll of poly, a can of foam, "the housewrap." It isn't a product. It's a continuous skin made of many materials that have to connect to each other without a break, all the way around the building, with no gaps where the wall meets the floor, the roof, a window, or itself at a corner.
The test we use to check whether an air barrier is real: take a red pen, trace the continuous line of it around a full wall section drawing without lifting the pen. If you can't, if the line has to jump from the sheathing tape to the window flashing to the ceiling poly and there's no detail showing how they join, that gap is where the house will leak. The materials matter less than the continuity. A taped exterior sheathing approach, a self-adhered membrane, or an interior poly approach can all work on the coast; what they can't survive is an undrawn joint.
This is why we bring the air-tightness detailing into the planning stage rather than leaving it to the framing crew to improvise. The corners, the rim joists, the window heads, the service penetrations, each is its own drawn detail before anyone orders insulation. And it's why the pre-drywall blower-door test exists at all: it's the last moment the barrier is still visible and a missed seam can be fixed with a roll of tape instead of a saw.
Batt, spray, and mineral wool, what each one is for
Insulation is the second layer of the conversation, and the honest answer for a Burnaby custom home is usually a combination rather than a single product. Each material does a job the others do less well.
- Fibreglass and mineral wool batts. The workhorse of the wall cavity. Inexpensive, easy to inspect, fully recyclable, and perfectly effective when the air barrier around them is intact, batts do nothing to stop air movement themselves. Mineral wool batts (Rockwool is the common brand) add fire resistance and don't slump or absorb water the way fibreglass can, which matters in a damp coastal wall.
- Spray foam. Closed-cell spray foam is both an insulator and an air barrier in one application, which makes it our default at the awkward geometry, the rim joists, tricky cantilevers, and tight cathedral-ceiling pockets where a batt can't be packed continuously. It's not the right answer for filling every wall cavity on the project; it's the right answer where air-sealing and insulating need to happen in the same hard-to-reach spot.
- Rigid mineral wool as continuous exterior insulation. This is the layer that sits outboard of the sheathing, wrapping the whole structure in an unbroken blanket so heat can't shortcut through the studs. It's the single biggest lever for moving a wall toward Step 5, and on the coast we favour rigid mineral wool over rigid foam because it lets the wall dry outward and it's non-combustible. It also pushes the cladding plane out a few inches, which ties directly back to the cladding assembly.
We don't sell one product as the answer. We match the material to the location, and the rule running through all of it is the same one we apply to finishes, there's no builder-grade shortcut that survives a coastal climate.
Thermal bridging: the heat shortcut through the structure
Even a wall full of insulation has a built-in weakness: the wood framing itself. Studs, plates, headers, and the rim joist conduct heat far faster than the insulation between them, so every framing member is a small bridge carrying warmth out of the house. Across a whole wall, those bridges add up and pull the real-world performance below what the cavity insulation promises on paper.
The fix is the continuous exterior insulation layer, the rigid mineral wool outboard of the sheathing, because it covers the studs and the gaps between them with one unbroken layer, so there's no straight path for heat to follow through the wood. This is the core move that separates a Step 3 wall from a Step 5 wall, and it's why the two share the same DNA.
Three spots bridge worst and deserve their own attention on the drawings:
- Rim joists, where stacked framing sits right at the temperature boundary, sealed and insulated as their own detail, as above.
- Corners, where studs cluster three-deep and the inside surface can run cold enough to grow mould if the assembly is thin. Advanced framing and the continuous exterior layer both help here.
- Window openings, where the framing around the rough opening, the deeper jamb that comes with exterior insulation, and the air-seal all meet. Get the insulation tucked tight to the frame and the bridge closes; leave a gap and the window becomes a cold spot that drips condensation in February.
None of this is exotic. It's ordinary building science applied with discipline at the seams, which is exactly the work that separates a house that meets the code on paper from one that's genuinely warm, dry, and quiet through a Burnaby winter.
Frequently asked questions
Does my Burnaby custom home have to pass a blower-door test? Yes. Meeting the BC Energy Step Code, Step 3 plus EL-4 in Burnaby today, is verified by a measured air-tightness test performed by a registered energy advisor. We schedule one before drywall, while the air barrier is still exposed and any missed seam can be fixed easily, and a final one near completion to confirm the result.
Is spray foam better than batt insulation? Neither is "better" on its own, they do different jobs. Closed-cell spray foam insulates and air-seals in one step, so we use it at rim joists and awkward geometry. Batts are effective and easy to inspect in open wall cavities, as long as the air barrier around them is continuous. Most coastal walls use a combination, plus a continuous exterior layer.
If I build to Step 3 now, will I have to renovate for Step 5 later? No. Step 5 isn't required for existing homes, and you're never forced to upgrade a finished house. More to the point, a Step 3 wall built with a tight air barrier and continuous exterior insulation is most of the way to Step 5 already, the difference is mostly the depth of that exterior layer and how tight the test result has to be, not a different wall.
Why does air-sealing matter for moisture, not just heat? Warm indoor air carries water vapour. When that air leaks out through gaps in winter and reaches the cold sheathing inside the wall, the moisture condenses and can't dry, which leads to rot and mould, the failure pattern coastal walls are most prone to. A continuous air barrier keeps that moist air out of the assembly, so air-sealing protects the structure as much as the heating bill.
Related on the Journal
- BC Energy Step Code explained for homeowners
- Choosing exterior cladding for a Burnaby custom home
- Windows and glazing for a Burnaby winter
Frequently asked questions
- Does a Burnaby custom home have to pass a blower-door test?
- Yes. Meeting the BC Energy Step Code, Step 3 plus EL-4 in Burnaby, is verified by a measured airtightness test performed by a registered energy advisor. Icon Projects schedules one before drywall, while the air barrier is still exposed and any missed seam can be fixed easily, and a final one near completion to confirm the result.
- Is spray foam better than batt insulation for a BC custom home?
- Neither is better on its own, they do different jobs. Closed-cell spray foam insulates and air-seals in one step, so we use it at rim joists and awkward geometry. Batts are effective and easy to inspect in open wall cavities, as long as the air barrier around them is continuous. Most coastal walls use a combination, plus a continuous exterior insulation layer.
- If I build to Step 3 now, will I have to renovate for Step 5 later?
- No. Step 5 is not required for existing homes, and you are never forced to upgrade a finished house. A Step 3 wall built with a tight air barrier and continuous exterior insulation is most of the way to Step 5 already, the difference is mostly the depth of that exterior layer and how tight the test result must be, not a completely different wall assembly.
- Why does air-sealing matter for moisture, not just heat loss?
- Warm indoor air carries water vapour. When that air leaks through gaps in winter and reaches cold sheathing inside the wall, the moisture condenses and cannot dry, which leads to rot and mould. A continuous air barrier keeps that moist air out of the assembly, so air-sealing protects the structure as much as it protects the heating bill. This failure pattern is what coastal walls are most prone to.
- Where does most air leakage happen in a Burnaby custom home?
- Air leakage concentrates at a predictable handful of seams rather than through the broad face of a wall: the rim joist where each floor meets the exterior wall, the wall-to-ceiling line where the air barrier has to turn continuously, the bottom plate where the wall sits on the slab or subfloor, every window and door rough opening, and any penetration for plumbing, electrical, or ventilation. Detailing each of these before framing closes is what determines the blower-door result.
- What does it mean to treat the air barrier as a system rather than a product?
- It means the air barrier is a continuous skin made of many connected materials, tape, membrane, sealant, and gaskets, rather than a single product like a roll of poly or a can of foam. The test is whether a continuous line can be traced around a full wall section drawing without lifting the pen. If the line has to jump between materials with no detail showing how they join, that gap is where the house will leak, regardless of how good any individual material is.
- What is thermal bridging, and how is it addressed in a Burnaby wall assembly?
- Thermal bridging is heat escaping through the wood framing itself, since studs, plates, headers, and the rim joist conduct heat far faster than the insulation between them, pulling real-world performance below what the cavity insulation promises on paper. The fix is a continuous exterior insulation layer, typically rigid mineral wool outboard of the sheathing, which covers the studs and the gaps between them with one unbroken layer so there is no straight path for heat to follow through the wood.
- When does a Burnaby home's blower-door test happen, and why does the timing matter?
- A blower-door test happens near the end of framing and again before drywall, when an energy advisor seals a calibrated fan into a doorway and depressurizes the house to measure how many times its full air volume leaks and gets replaced per hour. Testing before drywall matters because the air barrier is still visible, so any missed seam can be fixed with a roll of tape rather than requiring a saw and rework once the walls are closed.