On the Wet Coast, the wall that keeps water out is built in layers with a drained, vented gap behind the cladding. Here's how we detail a Burnaby envelope so it survives the rain and the 5-year warranty.
Why does a Burnaby wall need a gap behind the cladding?
Because water is going to get behind the cladding no matter what you do, and on the Wet Coast the only wall that lasts is one designed to drain. BC code calls this a second plane of protection, and under 9.27.2.2 of the BC Building Code it's mandatory anywhere annual rainfall exceeds 1,000 mm. That single threshold captures all of the Lower Mainland, Burnaby included. So before we talk about siding colours or stone, understand that the wall behind the finish is doing the real work.
The thinking changed after the leaky-condo era. For years the standard wall was "face-sealed": the idea being to caulk and seal every joint so tightly that no water ever entered. It doesn't work here. Sealants age, materials move, and wind drives rain into hairline gaps. Once water got into a face-sealed wall, it had nowhere to go, so it sat in the sheathing and rotted it out.
The rainscreen assumes the opposite. It assumes water will get past the cladding, and it puts a drained, vented gap behind that cladding so the water runs down and out, and so air can dry whatever's left. That gap is the difference between a wall that survives thirty Burnaby winters and one that becomes a warranty claim in year four.
The layers, from outside in
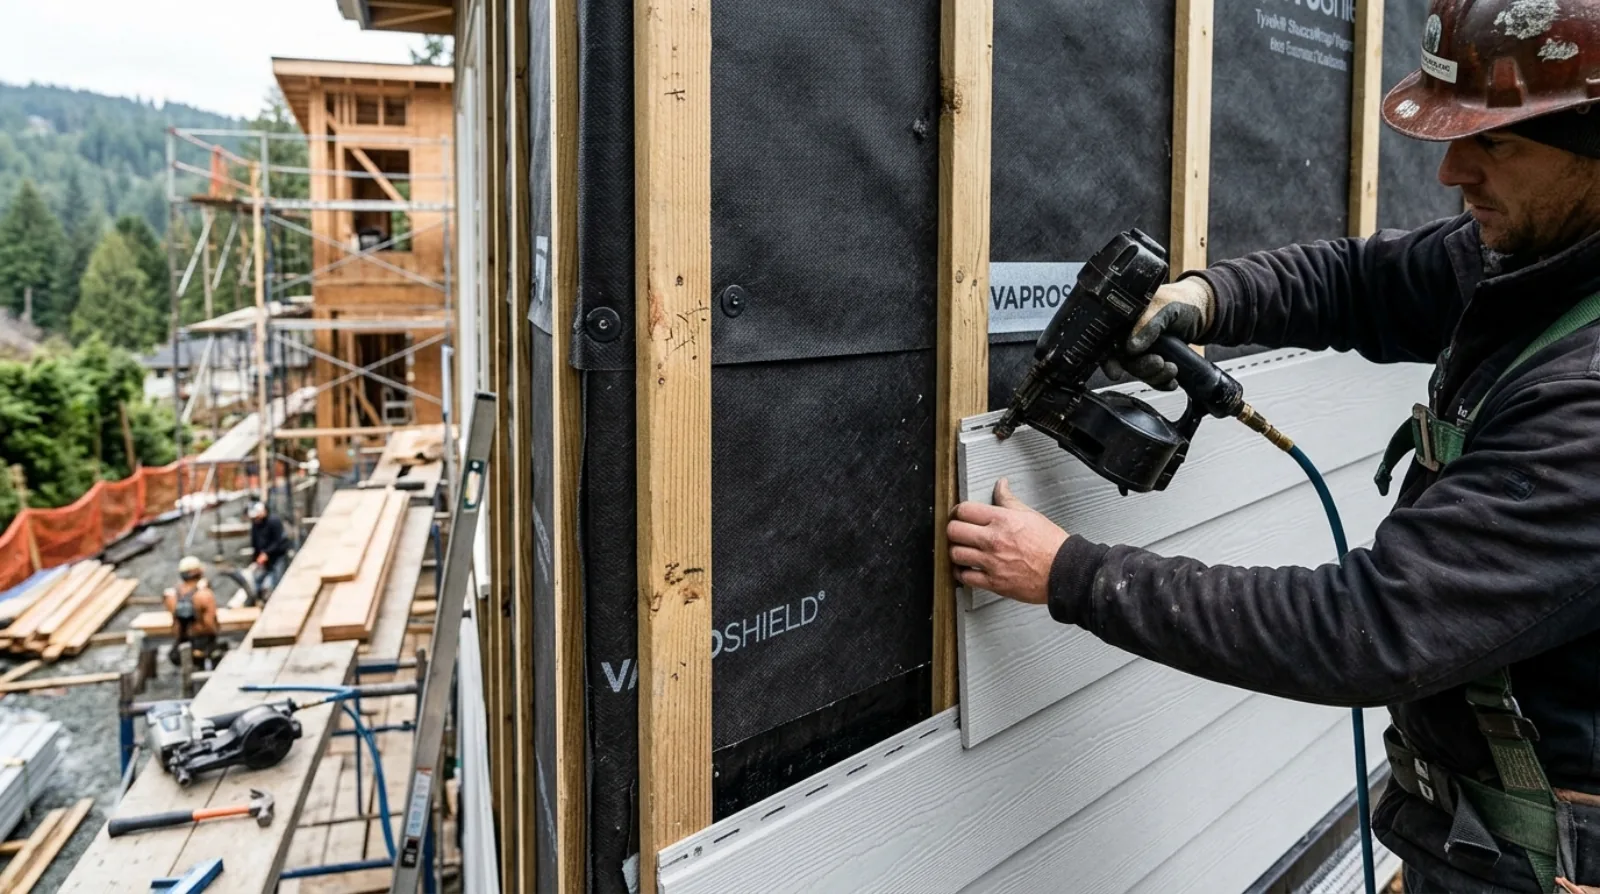
A custom-home wall in Burnaby is an assembly, not a single thing. Reading it from the weather side inward:
- Cladding, the visible finish. Fibre-cement, wood, brick, stone, metal, stucco. This is the first line, and it sheds the bulk of the water.
- Strapping and the cavity, vertical furring strips (commonly 19 mm) that hold the cladding off the wall and create the drained, vented gap. This is the rainscreen itself.
- Water-resistive barrier (WRB), a membrane (building paper or a self-adhered/mechanically-fastened sheet) that is the actual waterproof plane. Anything that gets past the cladding hits this and runs down.
- Sheathing, usually plywood or OSB, the structural skin that ties the framing together and gives the wall its racking strength.
- Insulation, in the stud cavity, and increasingly a layer of exterior insulation outboard of the sheathing to kill thermal bridging through the studs.
- Vapour control, the interior-side layer (often a smart vapour retarder or poly) that manages how moisture moves through the wall from the warm side.
Each layer has a job, and the order is not negotiable. Get the sequence of the WRB and the flashings wrong and you've built a wall that funnels water into the structure instead of away from it.
A rainscreen isn't a product you buy. It's a sequence you don't get to improvise, every lap, every flashing, every termination has a right order, and water audits the work whether or not anyone else does.
Icon Projects Team
The cavity is the part nobody sees and nobody should skip
The 19 mm gap is the whole design, and it's where corners get cut on builds that aren't watched closely. Two things have to be true for it to work: it has to drain, and it has to vent.
Drain means the bottom of the cavity is open and flashed so water exits at the base of the wall, not trapped on a ledge. Vent means there's airflow top and bottom so the cavity can dry between rains. A gap that's screened at the bottom against insects but sealed solid at the top isn't a vented rainscreen, it's a damp pocket. We detail the head and base of every cladding run, around every window, and at every transition so the cavity stays open the way it's meant to.
This is also where Burnaby's specifics show up. A flat lot in Big Bend and a steep one in Westridge or Buckingham Heights face the same rain, but the steep lot adds wind-driven moisture and more complex wall-to-grade and wall-to-deck transitions. Those transitions are where most envelope failures actually start, not in the middle of a clean wall, but at the messy junctions. The cladding choice matters too, and we get into the trade-offs of fibre-cement versus wood versus masonry in our piece on choosing exterior cladding for a Burnaby home.
Windows are the weak point, every time
You can build a perfect field of wall and still get a leak, because the leak almost always comes through a penetration, and the biggest penetration is the window. Water management at the rough opening is where envelope work is won or lost.
The principle is layering and shingling: the sill flashing goes in first and laps over the WRB below it, the window sets onto that, the jamb and head flashings lap correctly over the window flange, and the WRB above laps over the head. Done right, anything that gets behind the window runs down the sill flashing and back out the cavity. Done in the wrong order, head flashing tucked behind the WRB instead of over the window flange, and you've built a funnel pointing straight at the framing.
Burnaby winters are long, wet, and driven by southwest wind, which loads the rain onto walls and windows that a still-air test would never catch. We pay particular attention to the head and sill details on south- and west-facing elevations for exactly that reason. The glazing spec itself, frame, gasket, drainage path, is its own subject, and we cover it in windows and glazing for a Burnaby winter.
Air-sealing and the envelope are the same conversation now
The rainscreen keeps liquid water out. Air-sealing keeps air, and the moisture it carries, from leaking through the wall. They're different jobs handled by different layers, but on a modern Burnaby build they get planned together because both are tested at the end.
The BC Energy Step Code is a performance code: the house gets energy-modelled and then blower-door tested. Airtightness is measured in air changes per hour at 50 pascals (ACH50), and Step 3 is 2.5 ACH50 while Step 5 tightens to 1.0 ACH50. Burnaby requires Step 3 plus EL-4 as of January 1, 2025, tighter on the carbon side than the provincial baseline of Step 3 + EL-1. The province's default target moves to Step 5 by 2032, so we build toward that tightness now rather than redoing it later.
Here's the part that ties back to the envelope: a tighter wall is a wall that can't dry by accident. Once you seal a house to 2.5 ACH50 or better, you've removed the leaks that used to let a damp wall breathe. So the drying has to happen on purpose, through the vented rainscreen cavity on the outside and through mechanical ventilation (an HRV or ERV under CSA F326:23) on the inside. Tight and dry, working together. We go deeper on the air barrier and where exterior insulation pays off in insulation and air-sealing for a Burnaby custom home.
Why the 5-year warranty makes detailing a claim question
This is the part most homeowners don't connect, and it's the one that should change how you think about who builds your walls. The BC 2-5-10 home warranty carries a 5-year building-envelope term covering unintended water penetration that causes material damage. The envelope isn't a quality nicety. It's a five-year insured promise.
That changes the stakes on every flashing and lap. A sloppy window head detail that lets water into the sheathing isn't just a callback, it's a potential envelope claim against a licensed warranty provider, and the provider judges that claim against the BC Housing Residential Construction Performance Guide. When a builder details the rainscreen properly, they're not gold-plating; they're staying off the wrong side of a five-year obligation they're personally on the hook for.
It's also why we don't treat the envelope as the trade's problem to figure out on site. The flashing sequence, the WRB transitions, the cavity terminations, those get drawn and reviewed before the cladding crew shows up, not improvised in the rain. The warranty term is one more reason we lay out the documentation and risk early in planning a custom home, where envelope decisions belong.
Frequently asked questions
Is a rainscreen actually required by code in Burnaby, or is it optional? It's required. BC Building Code 9.27.2.2 mandates a second plane of protection, the drained, vented cavity behind the cladding, anywhere annual rainfall exceeds 1,000 mm. Burnaby and the rest of Metro Vancouver are well over that line, so a rainscreen is code-minimum, not an upgrade.
Can I use any cladding I want with a rainscreen? Mostly, yes. Fibre-cement, wood, metal, brick, stone and stucco can all be detailed over a rainscreen cavity, though each has its own flashing and support requirements. The cladding is the visible first layer; the rainscreen behind it is what makes any of those finishes durable in this climate.
How does the rainscreen relate to the 5-year warranty? The 2-5-10 home warranty covers the building envelope for five years against unintended water penetration that causes material damage. Because the rainscreen and its flashings are what keep water out, poor envelope detailing can turn into an envelope warranty claim. That's why proper detailing is a risk-management question, not just a finish-quality one.
Does a tighter, Step Code house trap moisture in the walls? It can, if the wall has no way to dry. That's why a modern Burnaby build pairs the airtight assembly with two intentional drying paths: the vented rainscreen cavity on the outside and mechanical ventilation (an HRV or ERV) on the inside. Tight and dry are designed together, not traded off.
The wall you'll never see again once the cladding goes up is the wall that decides whether your house stays dry for the next thirty years. On the Wet Coast there's no forgiving that detail later, so it gets built right the first time, in the right order, with the gap that does the work.
Related on the Journal
- Insulation and air-sealing for a Burnaby custom home
- Choosing exterior cladding for a Burnaby home
- Windows and glazing for a Burnaby winter
- What the BC 2-5-10 warranty actually covers
- Exterior and envelope renovation service
Frequently asked questions
- Is a rainscreen required by code in Burnaby, or is it optional?
- It is required. BC Building Code section 9.27.2.2 mandates a second plane of protection, the drained, vented cavity behind the cladding, anywhere annual rainfall exceeds 1,000 mm. Burnaby and the rest of Metro Vancouver are well over that threshold, so a rainscreen is the code minimum, not an upgrade. Icon Projects builds every exterior wall to this standard.
- Can I use any cladding material with a rainscreen system?
- Mostly yes. Fibre-cement, wood, metal, brick, stone, and stucco can all be detailed over a rainscreen cavity, though each has its own flashing and support requirements. The cladding is the visible first layer; the rainscreen cavity behind it is what makes any of those finishes durable in this climate.
- How does the rainscreen relate to the 5-year building envelope warranty?
- The 2-5-10 home warranty covers the building envelope for five years against unintended water penetration that causes material damage. Because the rainscreen and its flashings are what keep water out of the wall assembly, poor envelope detailing can become an envelope warranty claim. That is why proper detailing is a risk-management question, not just a finish-quality one.
- Does a tighter Step Code house trap moisture in the walls?
- It can, if the wall has no way to dry. A modern Burnaby build pairs the airtight assembly with two intentional drying paths: the vented rainscreen cavity on the outside and mechanical ventilation through an HRV on the inside. Tight and dry are designed together, not traded off against each other.
- What layers make up a rainscreen wall assembly on a Burnaby custom home?
- Reading from the outside in, the layers are the cladding, strapping that creates the drained, vented cavity, a water-resistive barrier that is the actual waterproof plane, structural sheathing, insulation in the stud cavity and often an outer layer as well, and an interior vapour control layer. Each layer has a specific job, and the order they go in is not something a crew can improvise on site.
- Why do windows cause more building envelope leaks than a plain section of wall?
- A window is a large penetration through the wall, and water management at the rough opening depends on layering the sill flashing, the window itself, and the jamb and head flashings so each one laps correctly over the layer below it. Get that shingling sequence wrong, for example tucking the head flashing behind the water-resistive barrier instead of over the window flange, and the assembly funnels water straight at the framing instead of shedding it.
- Why does the rainscreen cavity need to both drain and vent?
- Draining means the bottom of the cavity is open and flashed so water exits at the base of the wall instead of collecting on a ledge, and venting means airflow at the top and bottom lets the cavity dry out between rain events. A cavity that is screened at the bottom but sealed solid at the top is not a working rainscreen, it becomes a damp pocket that traps moisture instead of clearing it.
- Why did the industry move away from face-sealed walls to rainscreen construction?
- Face-sealed walls tried to caulk and seal every joint tightly enough that no water could ever get in, but sealants age and materials move, so wind-driven rain eventually found hairline gaps, and once inside a face-sealed wall the water had nowhere to go and rotted the sheathing. This pattern caused the region's leaky-condo era. The rainscreen approach instead assumes some water will get behind the cladding and gives it a drained, vented path back out before it can cause damage.